RHEL 7 网络配置相关
RHEL 7 Secondary IP 配置
Nmcli 命令行配置
通过命令行查看网卡配置
[root@jyzq-yum ~]
NAME UUID TYPE DEVICE
team0 450b2c70-83e2-43d8-8e1b-b908e7e348d0 team team0
pxe b81eca49-2e0d-4071-887d-c6075cba99b5 ethernet ens33
virbr0 e3f7f253-8344-46c9-af46-8ce346eb40a7 bridge virbr0
internet 9cfdfe8b-0f54-4c47-b9f5-b81e8079b13a ethernet --
pxe-test 73fb70b0-5534-43a2-b15f-112842d720cd ethernet --
|
NAME:是网络配置名称
TYPE:是网络配置的接口类型
DEVICE: 是网络配置应用的接口名称
我们找到需要配置的接口,此次以 ens33 为例,因此接下来我们需要配置 NAME 为 pxe 的网络配置文件。
查看网络配置:
[root@jyzq-yum ~]
connection.id: pxe
connection.uuid: b81eca49-2e0d-4071-887d-c6075cba99b5
connection.stable-id: --
connection.type: 802-3-ethernet
connection.interface-name: ens33
connection.autoconnect: yes
connection.autoconnect-priority: 0
connection.autoconnect-retries: -1 (default)
connection.multi-connect: 0 (default)
connection.auth-retries: -1
connection.timestamp: 1615169524
connection.read-only: no
connection.permissions: --
connection.zone: --
connection.master: --
connection.slave-type: --
connection.autoconnect-slaves: -1 (default)
connection.secondaries: --
connection.gateway-ping-timeout: 0
connection.metered: unknown
connection.lldp: default
connection.mdns: -1 (default)
connection.llmnr: -1 (default)
802-3-ethernet.port: --
802-3-ethernet.speed: 0
802-3-ethernet.duplex: --
802-3-ethernet.auto-negotiate: no
802-3-ethernet.mac-address: --
802-3-ethernet.cloned-mac-address: --
802-3-ethernet.generate-mac-address-mask:--
802-3-ethernet.mac-address-blacklist: --
802-3-ethernet.mtu: auto
802-3-ethernet.s390-subchannels: --
802-3-ethernet.s390-nettype: --
802-3-ethernet.s390-options: --
802-3-ethernet.wake-on-lan: default
802-3-ethernet.wake-on-lan-password: --
ipv4.method: manual
ipv4.dns: 223.5.5.5,223.6.6.6
ipv4.dns-search: --
ipv4.dns-options: ""
ipv4.dns-priority: 0
ipv4.addresses: 10.32.1.115/24
ipv4.gateway: 10.32.1.202
ipv4.routes: { ip = 10.0.0.0/8, nh = 10.32.1.254, mt = 5 }
ipv4.route-metric: -1
ipv4.route-table: 0 (unspec)
ipv4.routing-rules: --
ipv4.ignore-auto-routes: no
ipv4.ignore-auto-dns: no
ipv4.dhcp-client-id: --
ipv4.dhcp-timeout: 0 (default)
ipv4.dhcp-send-hostname: yes
ipv4.dhcp-hostname: --
ipv4.dhcp-fqdn: --
ipv4.never-default: no
ipv4.may-fail: yes
ipv4.dad-timeout: -1 (default)
ipv6.method: ignore
ipv6.dns: --
ipv6.dns-search: --
ipv6.dns-options: ""
ipv6.dns-priority: 0
ipv6.addresses: --
ipv6.gateway: --
ipv6.routes: --
ipv6.route-metric: -1
ipv6.route-table: 0 (unspec)
ipv6.routing-rules: --
ipv6.ignore-auto-routes: no
ipv6.ignore-auto-dns: no
ipv6.never-default: no
ipv6.may-fail: yes
ipv6.ip6-privacy: -1 (unknown)
ipv6.addr-gen-mode: stable-privacy
ipv6.dhcp-duid: --
ipv6.dhcp-send-hostname: yes
ipv6.dhcp-hostname: --
ipv6.token: --
proxy.method: none
proxy.browser-only: no
proxy.pac-url: --
proxy.pac-script: --
GENERAL.NAME: pxe
GENERAL.UUID: b81eca49-2e0d-4071-887d-c6075cba99b5
GENERAL.DEVICES: ens33
GENERAL.STATE: activated
GENERAL.DEFAULT: yes
GENERAL.DEFAULT6: yes
GENERAL.SPEC-OBJECT: --
GENERAL.VPN: no
GENERAL.DBUS-PATH: /org/freedesktop/NetworkManager/ActiveConnection/1
GENERAL.CON-PATH: /org/freedesktop/NetworkManager/Settings/1
GENERAL.ZONE: --
GENERAL.MASTER-PATH: --
IP4.ADDRESS[1]: 10.32.1.115/24
IP4.GATEWAY: 10.32.1.202
IP4.ROUTE[1]: dst = 10.32.1.0/24, nh = 0.0.0.0, mt = 100
IP4.ROUTE[2]: dst = 0.0.0.0/0, nh = 10.32.1.202, mt = 100
IP4.ROUTE[3]: dst = 10.0.0.0/8, nh = 10.32.1.254, mt = 5
IP4.DNS[1]: 223.5.5.5
IP4.DNS[2]: 223.6.6.6
IP6.ADDRESS[1]: fd00::13:20c:29ff:fe43:ac3e/64
IP6.ADDRESS[2]: fe80::20c:29ff:fe43:ac3e/64
IP6.GATEWAY: fe80::21f:9eff:fe2b:bc20
IP6.ROUTE[1]: dst = fd00:0:0:13::/64, nh = ::, mt = 256
IP6.ROUTE[2]: dst = fe80::/64, nh = ::, mt = 256
IP6.ROUTE[3]: dst = ::/0, nh = fe80::21f:9eff:fe2b:bc20, mt = 1024
IP6.ROUTE[4]: dst = ff00::/8, nh = ::, mt = 256, table=255
|
通常来说,我们关注配置中的以下几项:
- connection.autoconnect,配置 ‘yes’ 即系统启动后自动使用该配置,否则配置 ‘no’.
- ipv4.addresses,配置接口 IP 地址和子网掩码
- ipv4.gateway,配置接口的网关地址
- ipv4.routes,配置网络路由
- ipv4.method,配置接口获取 IPv4 地址的方式,可选 ‘auto’,’manual’
- ipv4.dns,配置 DNS 地址
通过命令行配置网卡配置
添加 Secondary IP
添加 192.168.1.115/24 的 secondary 地址
nmcli connection modify pxe +ipv4.address 192.168.1.115/24
|
- 注意: 此处是 “+ipv4.address IP“ 而不是 “ipv4.address _IP“ 。如果使用 “ipv4.address _IP*“ 会 overwrite 掉之前配置的地址。
添加路由 172.10.20.0/24 指向 192.168.1.254,metric 为 5.
nmcli connection modify pxe +ipv4.routes "172.10.20.0/24 192.168.1.254 5"
|
查看配置
[root@jyzq-yum ~]
ipv4.method: manual
ipv4.dns: 223.5.5.5,223.6.6.6
ipv4.dns-search: --
ipv4.dns-options: ""
ipv4.dns-priority: 0
ipv4.addresses: 10.32.1.115/24, 192.168.1.115/24
ipv4.gateway: 10.32.1.202
ipv4.routes: { ip = 10.0.0.0/8, nh = 10.32.1.254, mt = 5 }; { ip = 172.10.20.0/24, nh = 192.168.1.254, mt = 5 }
ipv4.route-metric: -1
ipv4.route-table: 0 (unspec)
ipv4.routing-rules: --
ipv4.ignore-auto-routes: no
ipv4.ignore-auto-dns: no
ipv4.dhcp-client-id: --
ipv4.dhcp-timeout: 0 (default)
ipv4.dhcp-send-hostname: yes
ipv4.dhcp-hostname: --
ipv4.dhcp-fqdn: --
ipv4.never-default: no
ipv4.may-fail: yes
ipv4.dad-timeout: -1 (default)
|
可以注意到ipv4.addresses 和ipv4.routes 两项配置已变更。
但需注意,此时网卡的配置尚未生效,需要使用 nmcli connection up pxe 来使配置应用到对应的网卡接口上。
Nmtui 使用图形化界面配置
使用 Nmtui 查看配置
在命令行中输入 nmtui,出现下面图形界面.
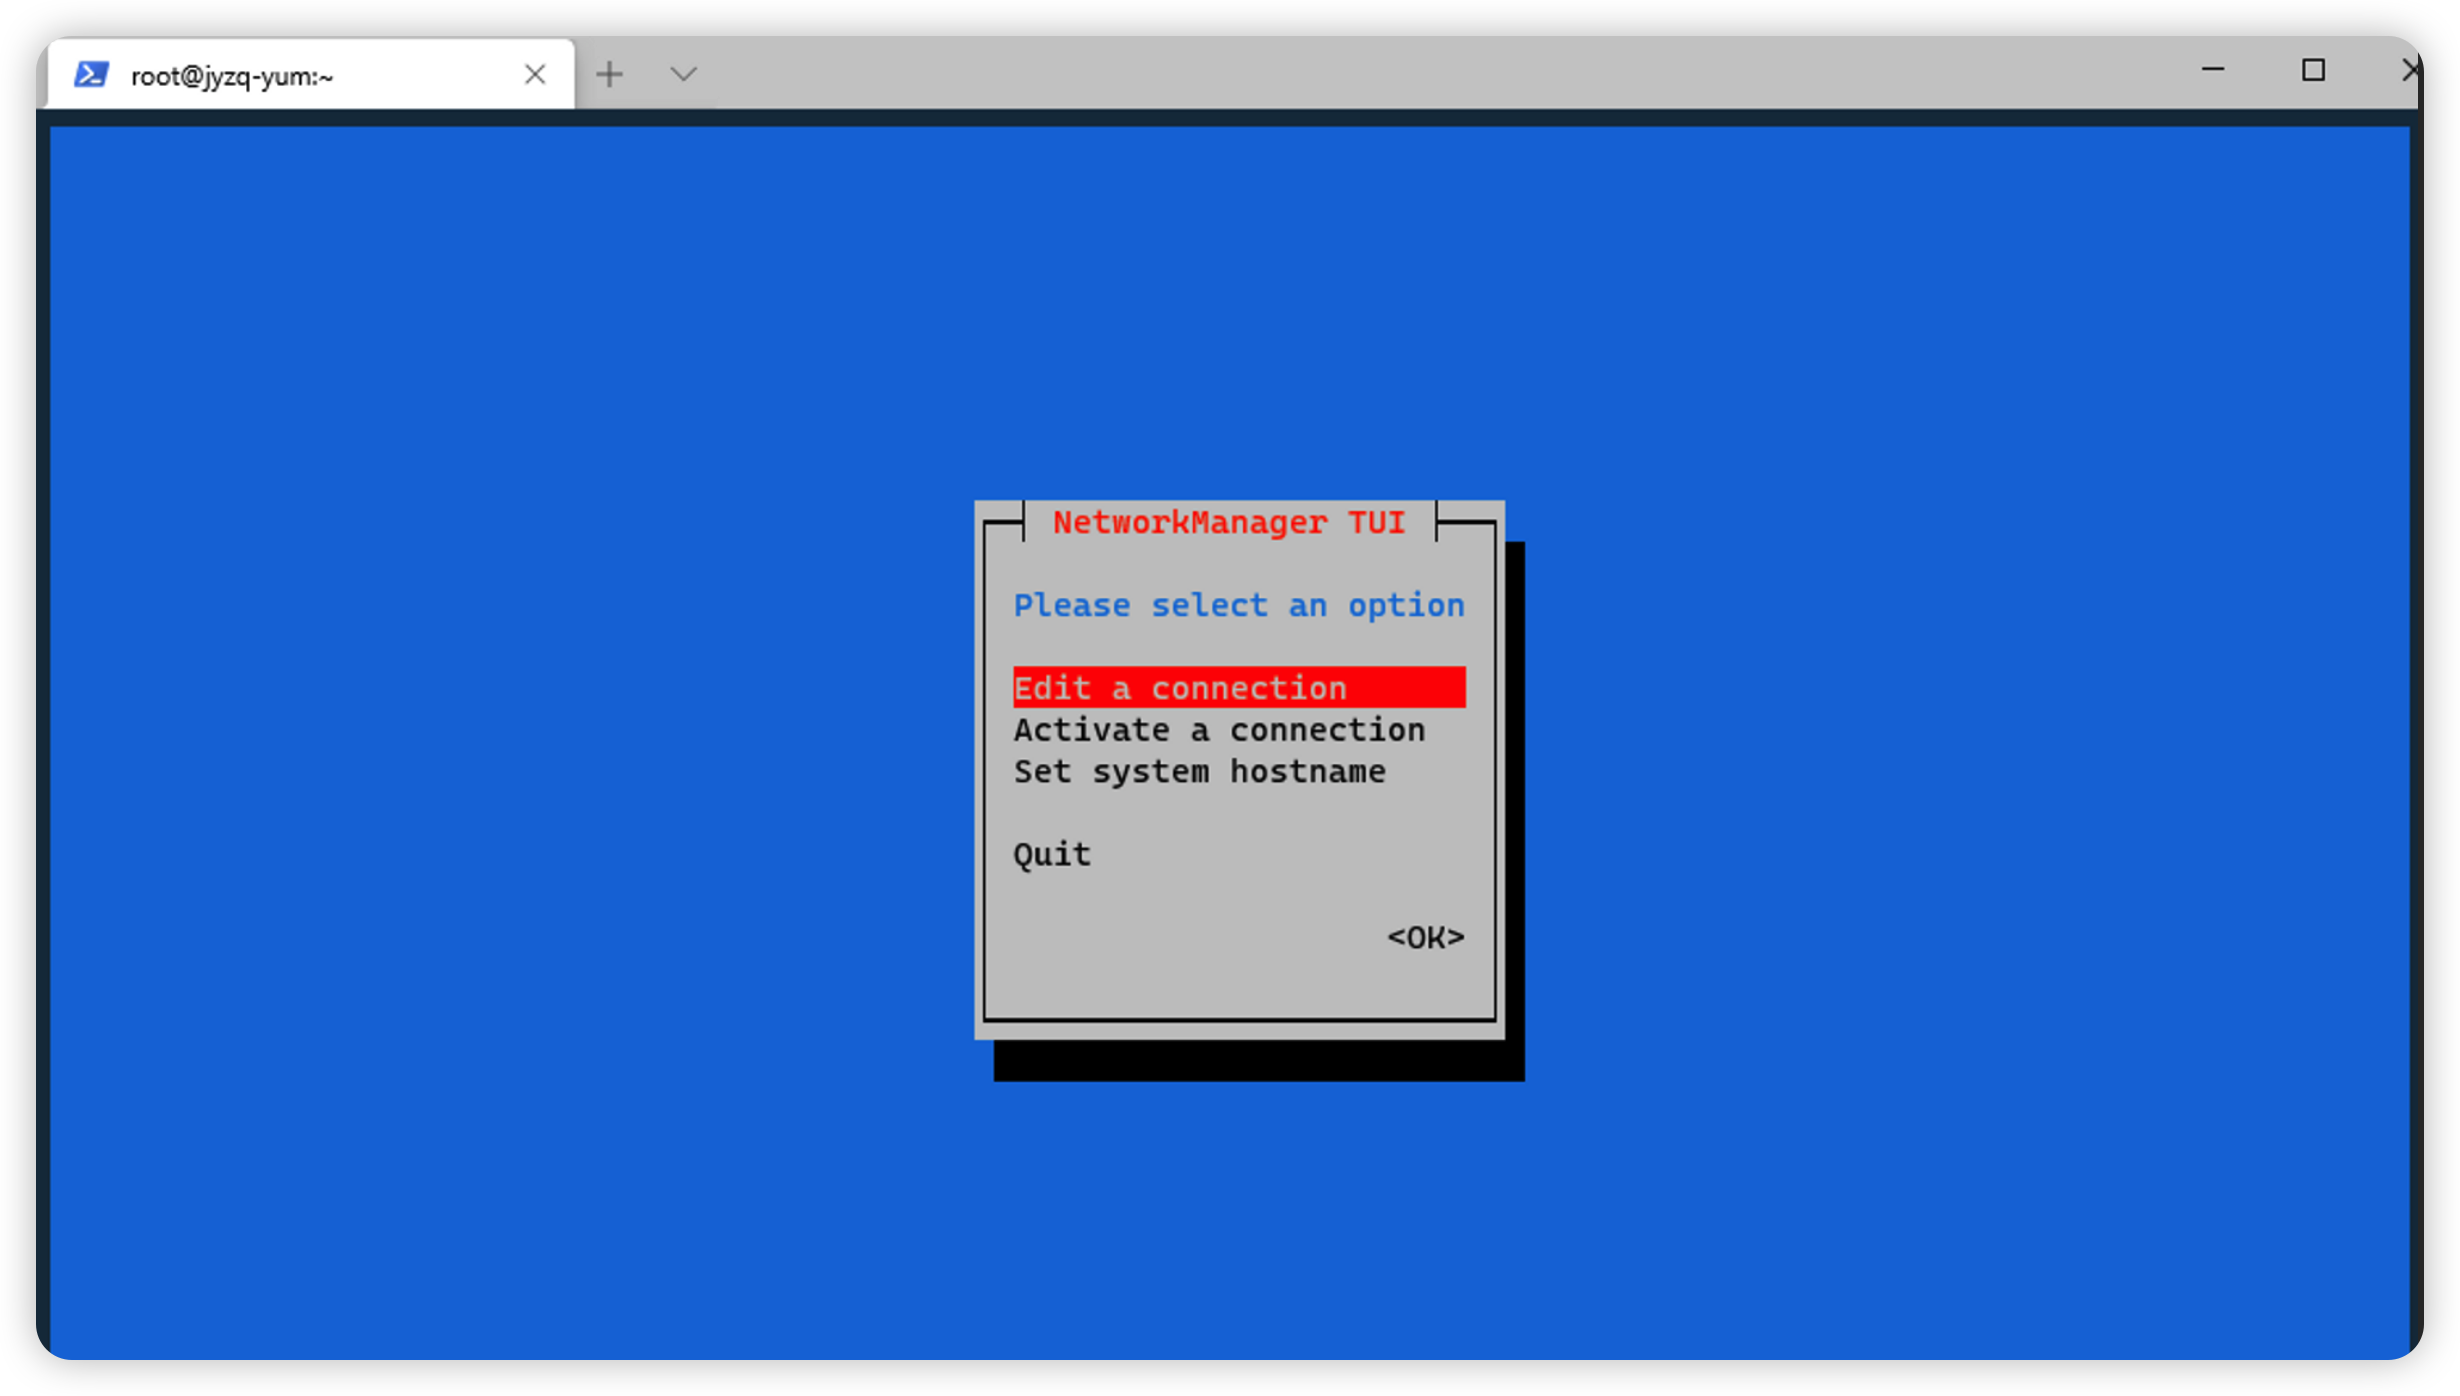
选择 “Edit a connection”,进入配置选择界面。
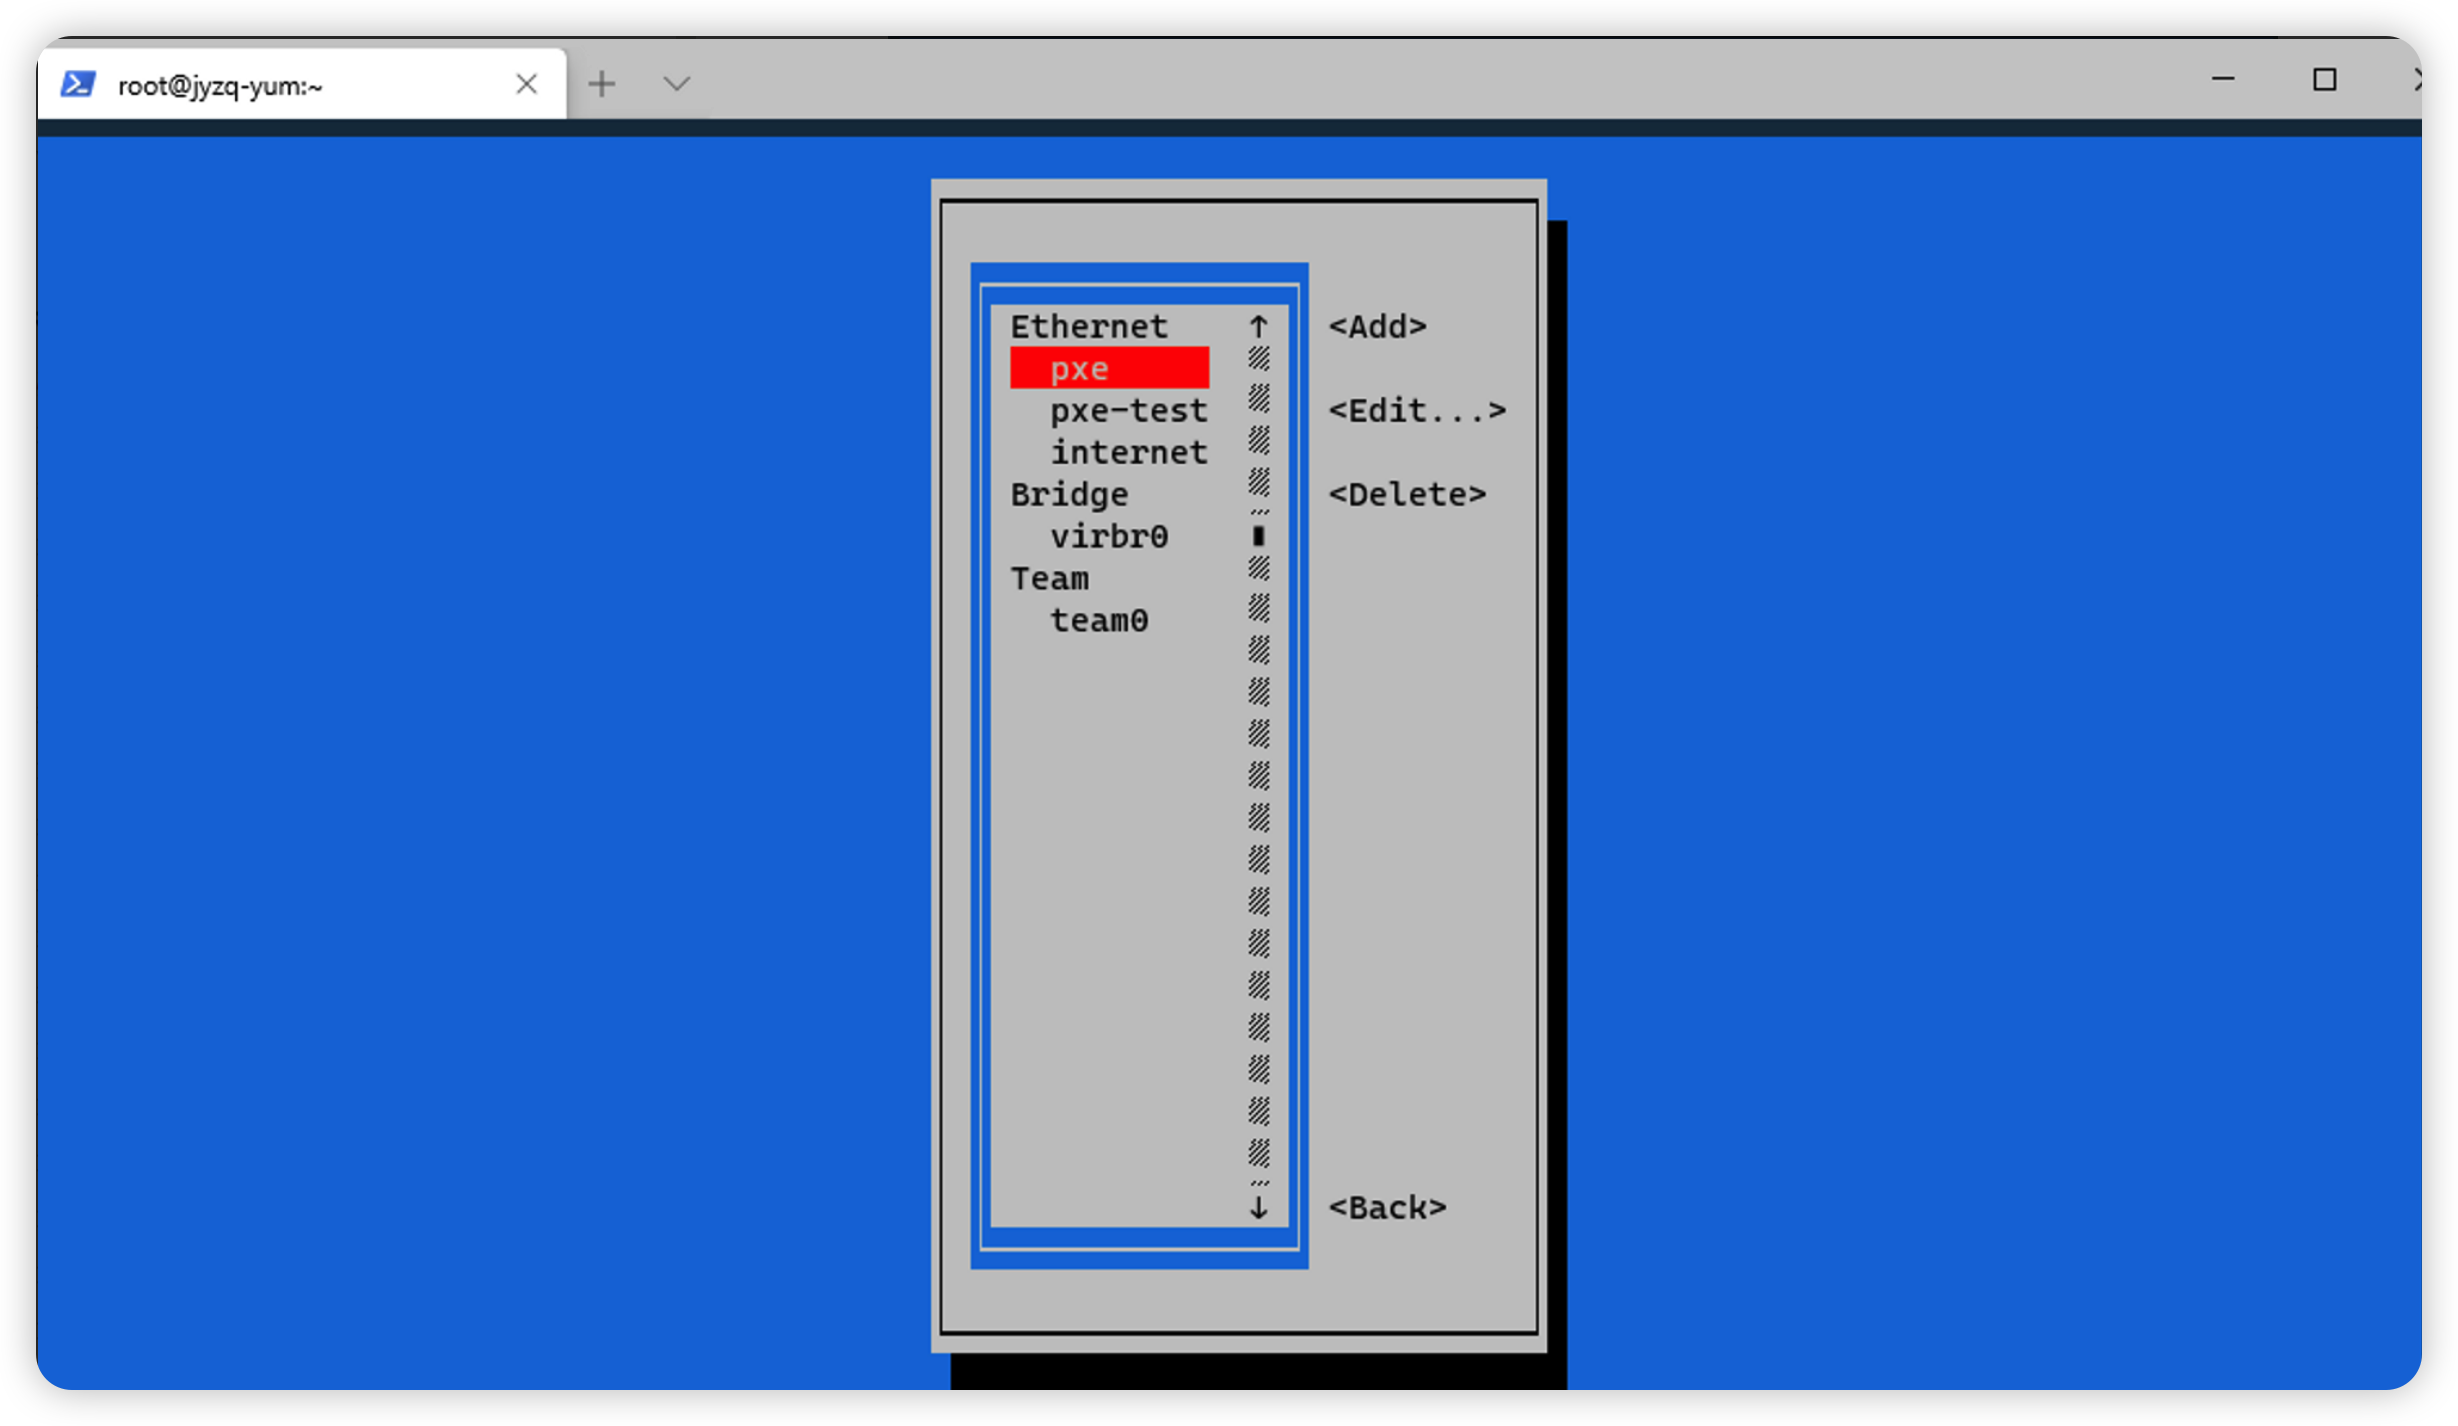
选择需要配置的配置,此次配置 pxe

添加 secondary ip


配置路由


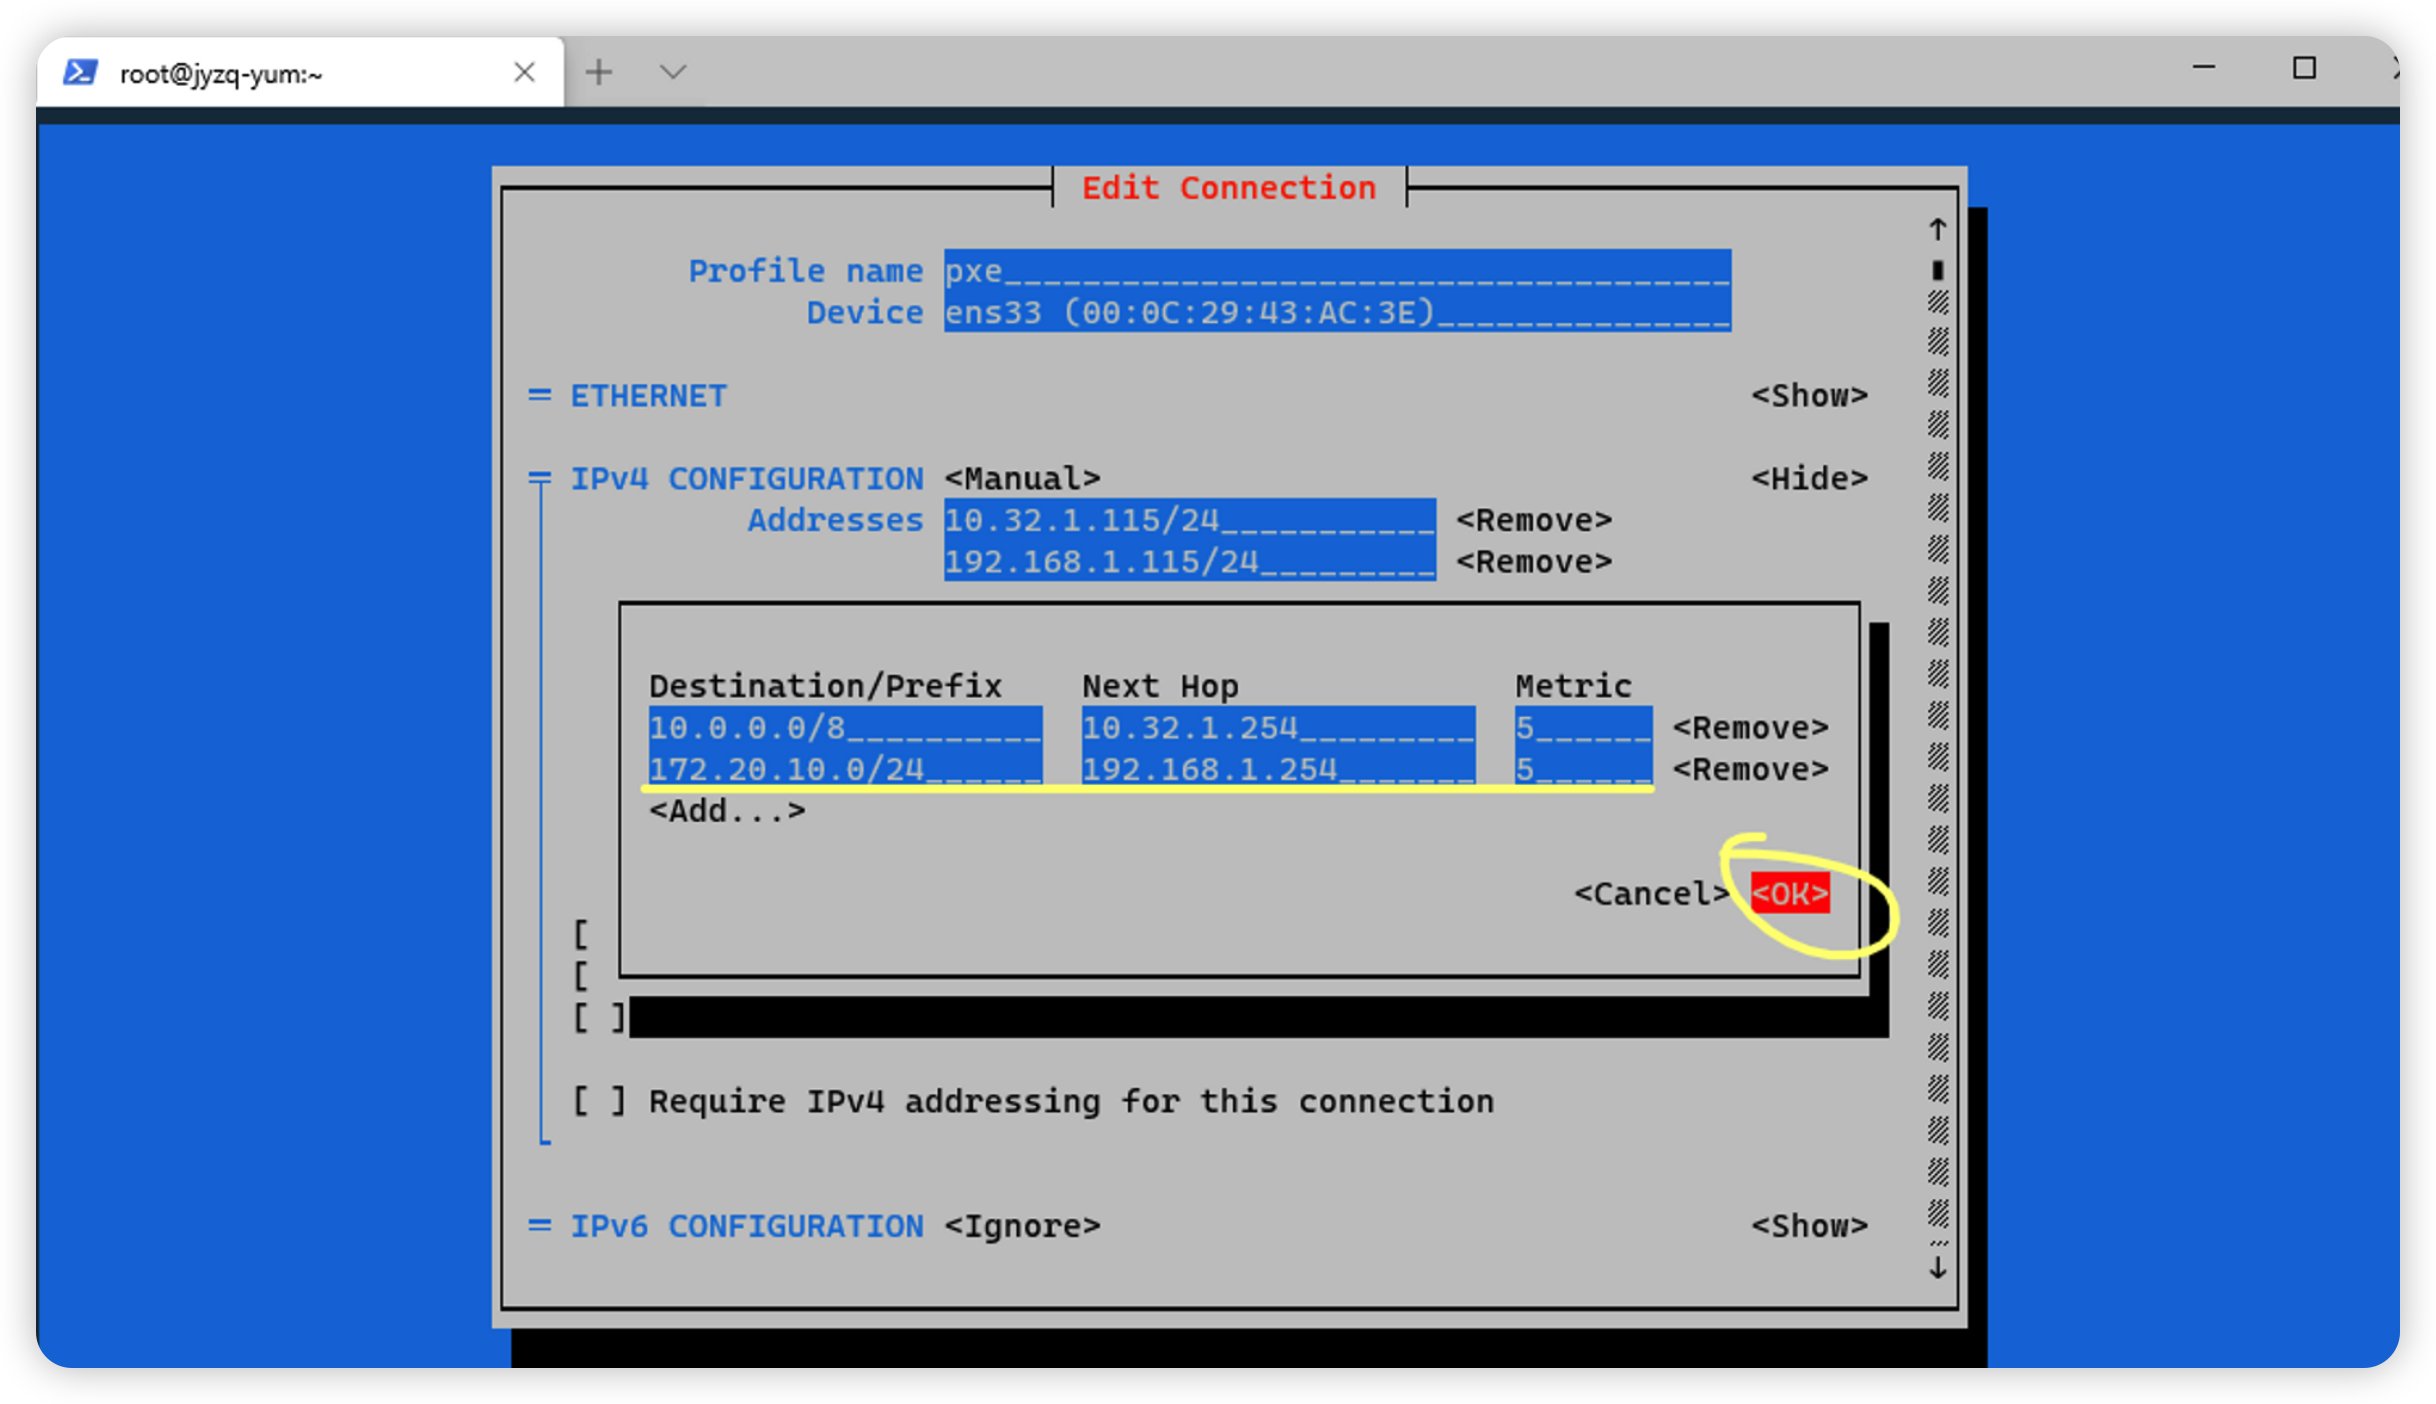
保存配置

激活配置文件
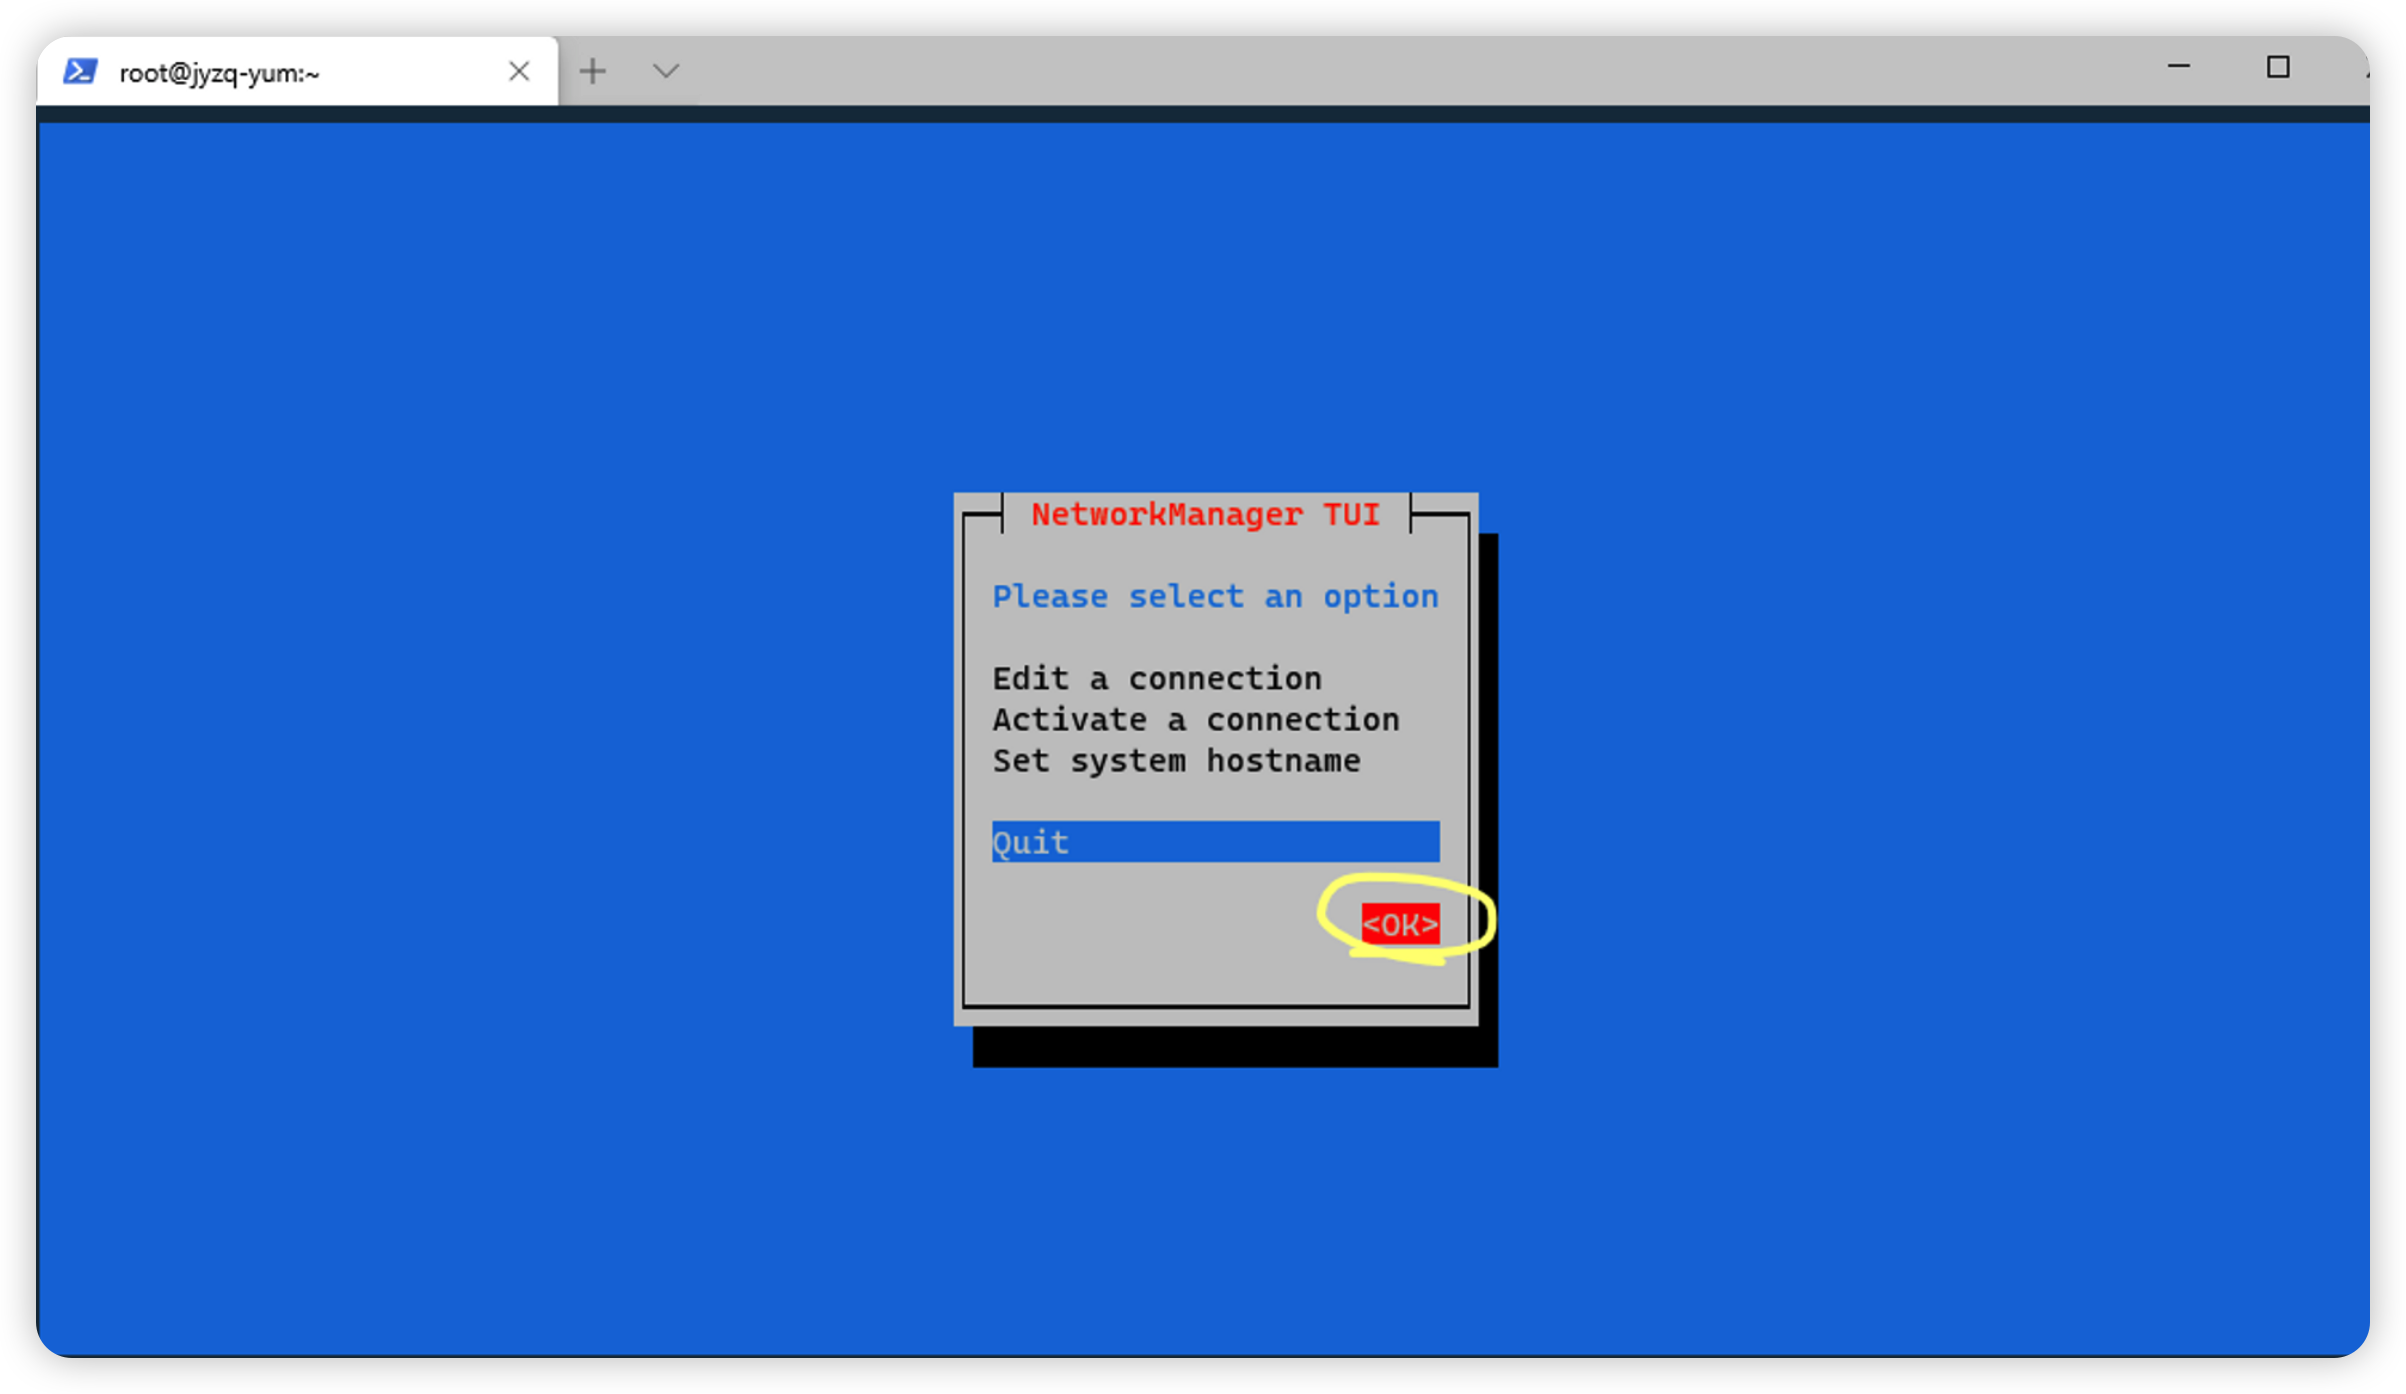
退出图形界面后,需要使用 nmcli connection up pxe 来使配置应用到对应的网卡接口上。
